
Drone photography is a form of aerial photography which relies on remote-controlled drones to capture images. Drone photography allows photographers to find inaccessible angles or positions in the sky to capture a bird’s-eye view. Federal Aviation Administration (FAA) regulations require all commercial drone users to obtain a license to operate their drones in public. Drone enthusiasts may not need a license to operate a drone, depending on how it is used, the weight of the device, and a few other conditions set by the FAA.
The history of drone photography
Aerial photography has been around a lot longer than you might think, with the first aerial photograph captured by a hot air balloon in 1858.
Currently, compared to the technology we use today to take aerial photos, a lot has happened in between.
Drones mainly have their roots in the military, and being used as weapons and for surveillance, but in 2006, organizations and governments were often using drones for other non-military reasons; thus, changed the public’s view of the use of drones.
That same year (2006), the FAA started issuing commercial drone licenses. These drones were used for things such as pipeline inspection, security, and product evaluation in the agricultural industry. Drones were limited and not easy to manage, and needed much more effort than the drones we fly nowadays.
In 2010, Parrot company released their initial ready-to-fly drone, that could be controlled through a smartphone with a Wi-Fi connection.
What makes drone photography so attractive?
Why do people love drone photography so much and why has it become so popular? Aerial photos resonate so much with people because it is a landscape we don’t normally get to see, and we are drawn to the new and unknown.
There is such curiosity about things beyond our abilities. We can visit wonderful places, but how often can we see these places from a bird’s-eye view, unless we get into a helicopter or a plane?
This perspective gives the images that wow factor, that makes them so captivating. As drones becoming more affordable and user-friendly, this view is becoming more and more common, but it is still a new tech, so there is much more to see and experiment with.
What are the challenges of drone photography?
Drones may be able to take new and creative aerial photos, but there are some challenges to drone photography, like:
Flying
Flying the drone is perhaps the most challenging part of drone photography. If you already know how to shoot, your biggest hurdle is learning how to hold the drone steady, avoid power lines, or move it in precise directions to have the ideal position.
Weather
Weather can play a big role in how your photos look. Cloudy skies or strong winds can prevent high aerial shots, and give the photographer less control over their shots than when using a handheld camera.
Quality
The image quality of a drone camera may not be as good as that of a DSLR camera, that means it’s a bit more challenging to get the perfect shot.
Drone photography tips
1- Check the UAV forecast
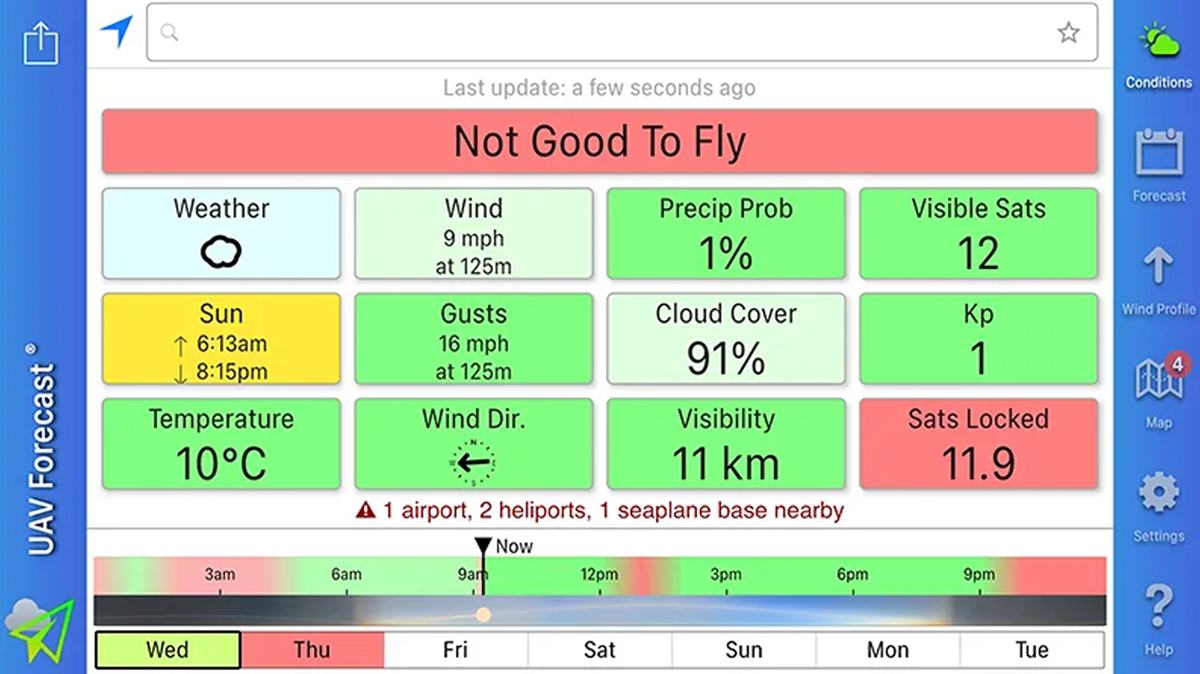
The first thing you should do before taking your drone photo session is to check the UAV forecast. This provides important information for the safety of the pilot, aircraft, and other people or nearby buildings. It tells you which areas are off limits, what the weather will be like that day, how many GPS satellites are active in a special area, and more.
Always check the forecast before you go out, as this can help you plan your shots accordingly.
2- Shoot in RAW format
Shooting in digital RAW format versus JPEG provides you more versatility in image post-processing. In this way, you gain uncompressed, and lossless image data from the sensor. A significant amount of detail and resolution which can be preserved involves greater levels of brightness, allowing you to make more exposure and color adjustments without the photo looking unnatural or, worse, posterized because of the color banding which occurs in lower-resolution JPEG images.
Most high-end drones which come with onboard cameras support RAW format for images. If you have a modular drone which lets you change your camera, remember to have one that allows you to shoot in RAW format.
3- use the thirds grid overlay for composition
Composition is the most important aspect of a photo. The arrangement of all visual elements in the frame dictates the balance between negative and positive space, plus the balance of colors in the image. It regularly takes some trial and error to get the right composition, but when you are using a camera that has a few hours of battery life on it, that is not a problem. However, with drones, you don’t have the same luxury. Most drones have an average flight time of 25 to 30 minutes. If you want to capture a special scene or subject, you need to get it right the first time.
To make sure your images are properly composed, be sure to frame your images thanks to the thirds grid overlay. Drone cameras normally have a thirds grid (in the companion app) to help users frame their shots more precisely, and thus enhance their compositions. If you have the choice to use an overlay grid, remember to use it as this will not just help you gain your composition right the first time, but it will also help you avoid any unwanted cropping in the post-processing stage.
4- Use lower ISO
Drone cameras typically have smaller sensors, that don’t perform well at high ISO settings. This is especially true for the Phantom 3 range, that delivers reasonably good images but comes with significant amounts of undesired grain and noise when the ISO is set above 100. Unless you are photographing at night, enough lighting shouldn’t be a problem when it comes to drone photography, there is no need to use high ISO settings.
In general, you’ll want to use the lowest possible ISO, that is to say you’ll need to manually adjust your camera settings to properly expose your image. When photographing in windy or shady locations, take in your regard of opening up your aperture or using a slower shutter speed (1/6 second will do the trick) to let in more light and can use the lowest ISO for clean, sharp photos.
5- Take advantage of Auto Exposure Bracketing
Some drones have an Auto Exposure Bracketing (AEB) feature, which helps you shoot very realistic photos with high dynamic range in one go. This allows you to take multiple shots of the same photo at different exposures and settings, providing you more choices to work with. You can easily choose the photo with the best exposure levels, or you can combine them all into one photo and use the best parts of each photo.
This is especially useful when you aim to save time and gain correctly exposed photos without having to take multiple test shots or create high-quality HDR photos.
6- Be ready to improvise
There will be times when no amount of exact planning can make you ready for difficult and unexpected photography situations. For example, the weather may change, or a location may suddenly be declared off-limit because of an emergency, despite close inspection of the UAV forecast and weather reports. In such cases, you have to learn how to do with what you have.
Use a dark sky to change the mood of your image. Use unexpected direct sunlight to shoot appealing shadows. Be creative and turn less-than-ideal situations into unexpected photo opportunities. The results may even be better than you expected.
7- make higher resolutions with panoramic shots
Drone cameras have limited image resolution because of their relatively low megapixel count. Of course, this does not include more expensive, higher end drones. However, if you need larger images with more pixels for more image detail, you can use the panorama technique.
Some drones have a built-in Panorama Mode, but if your drone’s camera doesn’t have this feature, you can simply take multiple shots and photograph more of the same scene while moving the camera, then edit the photos using editing software such as Adobe Lightroom to create a single, high-quality panoramic photo. This technique allows you to take higher resolution photos and preserve important image details, and capture an entire scene which cannot be captured with a single wide-angle shot because of the legal height restrictions for unmanned aerial vehicles.
